Review Items taskboard
The Review Items taskboard is kind of like a "home base" for reviewers; it's where most of your work to review items is completed. Use the taskboard to mark each of your items as approved or flagged.
Opening the taskboard
To open the Review Items taskboard from the Home page, select a review under the Open Reviews heading on the left side of the page.
To open the Review Items taskboard from any other page, go to the My Taskboards menu and select Review Items. The Review Items taskboard is displayed.
The taskboard is organized into the following areas:
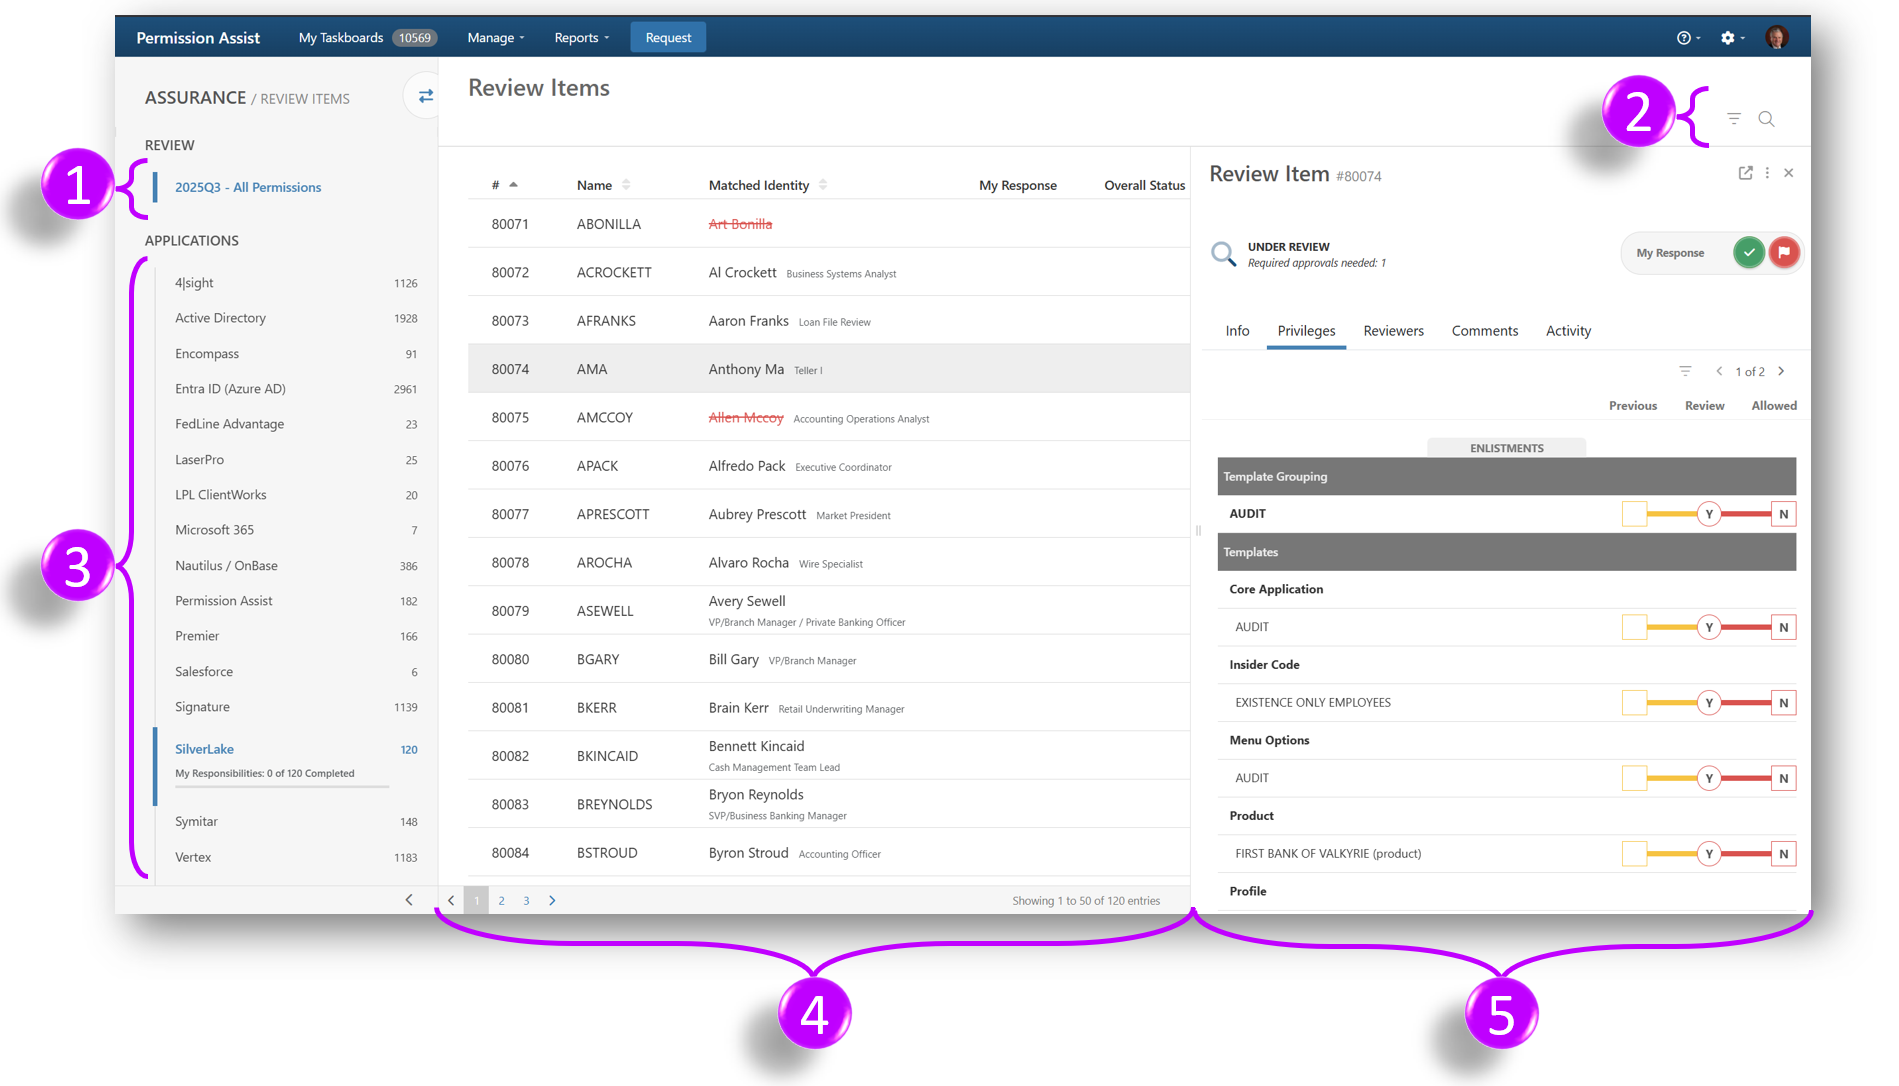
| Area | Name | Area | Name |
|---|---|---|---|
| 1 | Review information | 4 | Review items list |
| 2 | Search & filter | 5 | Review item details |
| 3 | Applications list |
Review information
This area displays the review name. If you have more than one open review occurring at the same time, or if you want to see a previously completed review, select the review name or select the Switch Review button. A new pane appears allowing you to select the review you'd like to view.
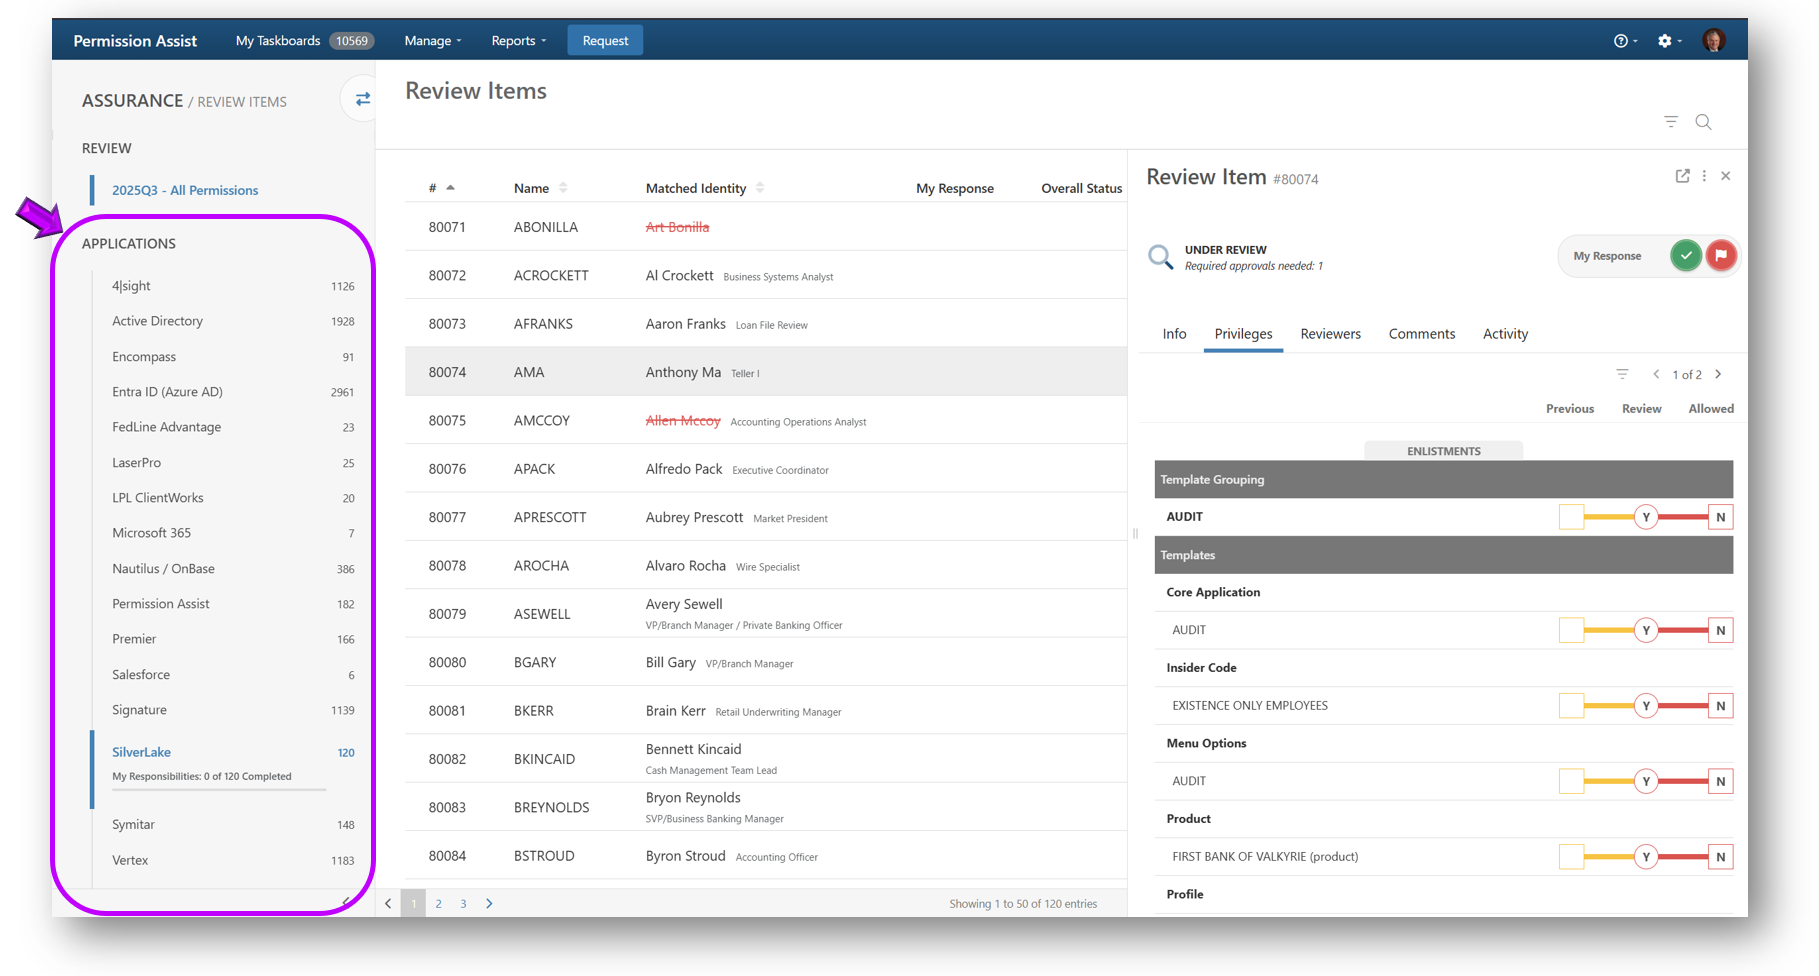
Applications list
The Applications List displays a list of applications included in the review. The Security Team is able to see all applications within the review. The Application Managers and Supervisors will only see the applications for which they have review responsibilities.
If the review includes multiple applications, select the application you want to review. After selecting an application, you'll see the progress of your responsibilities for that application, including the total number of items that need to be reviewed, the number of items that have already been reviewed, and a progress bar that provides a visual representation of your percentage complete.
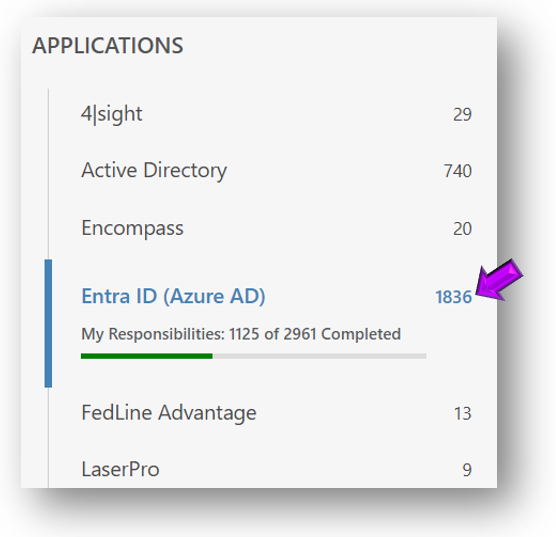
The number to the right of the application name indicates the number of items that still need to be reviewed. When all items have been reviewed, this number is replaced by a green check mark.
Review items list
After selecting an application, the review items associated with that application are displayed in the list on the right. Review items are sorted in alphabetical order by application username. Administrators and Security Team members will see all items within the application. Supervisors will only see items for employees that report to them.
Each review item has a bold heading which is the application username (or group name if you're completing a group review) as it appears in the application. If the item is an application user and Permission Assist was able to match the user with an Identity, the Identity name (and sometimes title) are displayed below the application username.
To select a review item, select the item you want to begin reviewing. The review item details area appears on the right side of the window.
Searching for and sorting review items
| Feature | Description |
|---|---|
| Search | Select the search field and enter the information you want to search for within the selected application. To search for the same information within another application, leave the information you entered in the search field and then select another application. If you're completing a group review you can search for items by the group name. If you're completing a user review, you can search for items by application username or group name, full name, or job title. |
| Filters | The Filters button allows you to view and sort information. After selecting the Filters button, the menu expands. Options include: |
- My Response Any -- This option allows you to quickly filter your list of review items by status based on your responses. For example, if you only want to see the list of items you still need to take action on, you can select this option and then select Pending; items will be removed from the list as you approve or flag them. You can always return to the original list to see all items by selecting the Show All option
- Overall Status -- This option allows you to quickly filter your list of review items by the overall status of the item, which includes responses from all reviewers. For example, if three people are required to review an item and only one person has approved the item, the overall status of the item is still considered Pending
- More -- Provides a list of additional filtering options
- Security Team -- This option is only available for Security Team members. It allows you to filter items based on whether the Security Team is required (Optional, Required, and Waiting on Final). If you're a Security Team member and also play another role such as supervisor, application owner, etc., you can use the "Required" option under the "Other Responses" heading to show only the items you're responsible for as those other roles (not you as a Security Team member)
Each of the selected filter options are used in combination with each other. For example, if you select My Response > Pending and also select More > Comments, the list would show review items with comments that you still need to approve or flag. The list could be sorted further by selecting additional options.
Review item details
After selecting a review item, the review item details area is displayed which allows you to review the information needed to either approve or flag the item for remediation.
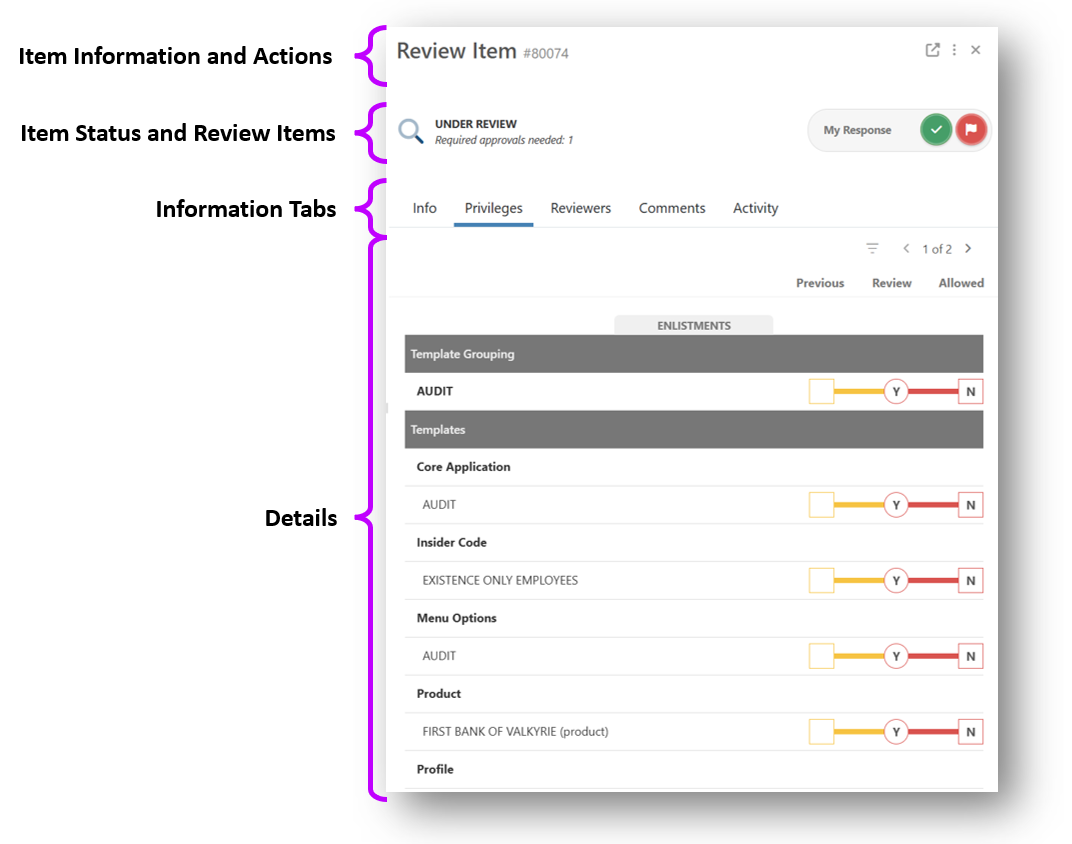
Item information and actions
| Element | Description |
|---|---|
| Item Number | This area displays the review item number. This number corresponds to the # column in the review items list. |
| Review Window | If you would like more room to see the item details, select this button to open a new tab that displays the details of the item within a new window. The current tab stays open, allowing you to come back to the review and continue from where you left. If you approve or flag the item in the new window and go back to the previous window, the status of the item is not refreshed until you refresh the window or select a different item. |
| Actions | This button allows you to reassign an identity, reassign the supervisor, add a reviewer, add comments, or start remediation. Refer to the Actions section for more detailed instructions on how to use each of these options. |
Review buttons
This area displays the status of the review item and allows you to take action on the item as needed to consider the item complete.
| Status | Description |
|---|---|
| Under Review | The item still needs to be reviewed. To take action on the item, select Approve (green checkmark), Flag, or Reset. If you've taken action on this item, and the item still appears to be under review, it means another reviewer is required to take action on this item before the item is considered complete. |
| Approved | The item is complete -- all required reviewers have approved this task. |
| Pre-Approved | The item is complete -- Permission Assist compared the permissions in this item to the permissions in the previous review and determined that either no permissions changed or permissions were removed. Permission Assist will never pre-approve items that are given additional or elevated permissions. Pre-Approval status can be removed by selecting the Remove Pre-approval button. Removing pre-approval status resets the item to the Under Review status, allowing you to either approve or flag the item. |
| Flagged | The item has been flagged, but the remediation has not yet started. To officially start the remediation process select the Actions button and pick Start Remediation from the list. |
| In Remediation | A remediation request has been created and the Provision Team has received the request. After a Provision Engineer resolves the request, the request may or may not be sent back to the reviewer for final approval depending on how remediation workflow is set up for your organization (in the System Configuration > General Settings > Taskboards > Reviews area). |
| Remediation Complete | This item has been remediated and is considered complete. |
Self-review restrictions
When a self-review restriction warning is displayed, it means you've been restricted from reviewing your own permissions. You can still view the information, permissions, comments and actions, but you will not be allowed to approve or flag the permissions.
If your System Configuration settings allow you to continue, you can do so by selecting the I understand and wish to continue button.
Information tabs
| Tab | Description |
|---|---|
| Info | Displays more detailed information about the review item. If you are doing a User review, information such as full name, status, email, last login date, etc. are displayed if the application has made that information available. If you are doing a Group review, information about the group is displayed. |
| Privileges | This tab allows you to view the privileges associated with this group or user. This tab is displayed by default after selecting an item. The "privilege dumbbells" within this area allow you to visually compare the privileges from the previous review to the privileges in the current review. If you are working on a user review and the user is matched to an identity that is assigned to an access model, the Role column allows you to compare the user's permissions to their assigned access model. |
| Reviewers | This tab allows you to see the details about the reviewers of this item such as which roles are required and which are optional, the number of reviewers required in each role, and whether other reviewers have taken action on the item or not. |
| Comments | This tab allows you to view or add comments. When a number is displayed in parenthesis, it indicates the number of comments that have been added to the item. Comments are viewable by other Permission Assist users and cannot be edited or removed after they've been added. |
| Activity | All actions taken on the item (e.g., system actions or reviewer actions to approve, flag, reassign, and so on) are recorded for historical and auditing purposes. Selecting this button allows you to review a list of actions taken related to the current item. |
Approving or flagging a review item
To approve or flag a review item, review the information on the User Info and Privileges tabs to determine if any changes need to be made. If no changes need to be made, you can approve the item by selecting the Approve button (green checkmark) in the review item details area. If changes are needed, you can flag the item by selecting the Flag button to begin the remediation process.
Privilege dumbbells explained
The privilege dumbbells provide visual cues to help you more quickly and easily compare permissions from the previous review to permissions in the current review. Color coding also helps alert you to elevations in permissions.
In your first review, you will see only one column of privileges displayed under the Now column. For each subsequent review you will see two or, for user reviews, sometimes three columns based on whether the user is with or without a role.
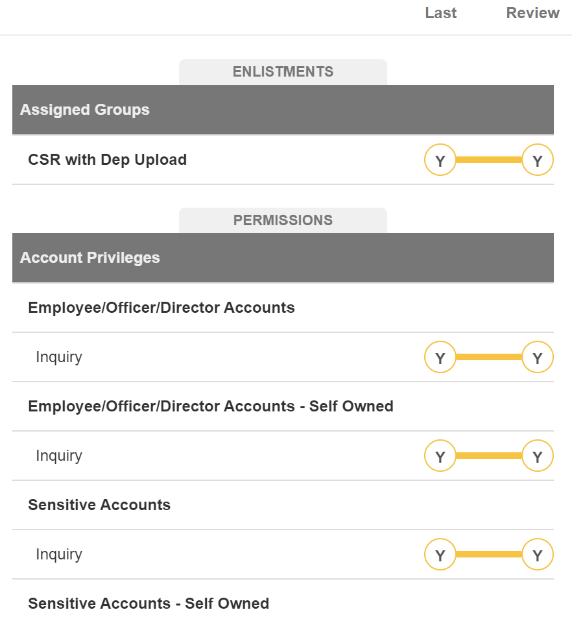
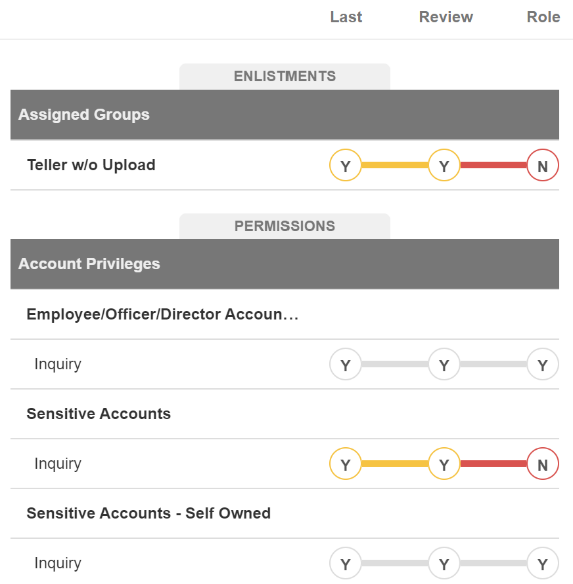
The purpose of the dumbbell chart is to help you make informed decisions about whether you should Approve or Flag this review item. It shows you exactly where a user has elevated privileges, where they are out of bounds compared to their role, and whether or not you've approved/flagged the review in the past.
Each bar in the dumbbell chart has a message associated with it. If you hover your cursor over the bar, a message is displayed. Examples include:
- "No change occurred since the previous review"
- "Accepted in the previous review, and no additional changes occurred"
- "An elevation of access has occurred since the previous review"
- "A reduction of access occurred since the previous review"
- "Access has been approved"
- "Access has not been approved"
- "Less access than what is approved"
- "An elevation of access has occurred, but the elevation has been approved because it aligns with the access model"
Comments tab
Each review item has a comments section where any reviewer can add additional information to the item as needed. Typically, comments are used to document the reason for approving or flagging an item, which helps the Provision Team understand the changes that need to be made.
Note
Comments are viewable by other Permission Assist users. Comments are saved for historical and auditing purposes; they cannot be edited or removed after they've been added.
Actions
The Actions button in the upper right corner of the detail panel allows you to complete additional tasks such as:
- Reassigning an identity
- Reassigning a review supervisor
- Adding a reviewer
- Adding comments
- Starting remediation
Reassign identity
If your System Configuration settings allow you to reassign Identities from the Review Items taskboard, the Reassign Identity option is enabled, allowing you to reassign the Identity on the review item.
To reassign an Identity, complete the following steps:
-
Select the Actions button in the upper right corner of the review item details area, and pick Reassign Identity from the list.
The Reassign Identity window opens, allowing you to reassign the user account for this application to a different identity.
-
Select one of the following options:
Option Description Always assign the selected identity to this application user Use this option to permanently reassign this identity to another user. Then, select the Select a new identity field and either type the name of the person or scroll down the list to select the person you want to assign to this identity. Always leave this application user unassigned Use this option if this identity should remain permanently unassigned. For just this review, assign the selected identity to this application user Use this option to temporarily reassign this identity to another user. The user will be reassigned to the newly selected user for the current review, but will return to the previously matched user for future reviews. For just this review, unassign any matched identity Use this option to temporarily unassign this identity. The user will be unassigned for the current review, but will return to the previously matched user for future reviews. -
Select the Save button. The actions are logged in the Activity tab.
Reassign review supervisor
If your System Configuration settings allow you to reassign supervisors from the Review Items taskboard, the Reassign Review Supervisor option is enabled, allowing you to reassign the supervisor for a review item. This can be helpful if, for example, the supervisor has left the organization or if the assigned supervisor does not participate in security audits such as C-level executives. Supervisors can be reassigned temporarily or permanently.
To reassign a supervisor, complete the following steps:
-
Select the Actions button in the upper right corner of the review item details area, and pick Reassign Review Supervisor from the list.
The Reassign Supervisor window opens.
-
Select one of the following options:
Option Description Always assign the selected supervisor to this application user/group Use this option to permanently reassign this user or group to the newly selected supervisor. Always leave the supervisor unassigned for this application user/group Use this option if the supervisor should be permanently unassigned. Items that are permanently unassigned will be escalated to the Security Team for review. For just this review, assign the selected supervisor to this application user/group Use this option to temporarily assign this user or group to the newly selected supervisor. The item will be reassigned to the new supervisor for the current review, but will return to the previously matched supervisor for future reviews. For just this review, unassign the supervisor Use this option to temporarily unassign this supervisor. The item will be unassigned for the current review, but will return to the previously matched supervisor for future reviews. -
If you are reassigning the item to a new supervisor, select the new supervisor from the Select a new identity field.
Tip
If you start typing the supervisor's first name, the list of identities is filtered to show people with similar names.
-
Select the Save button. The actions are logged in the Activity tab.
Add a reviewer
There are times when you may want to invite others to the review process. In these cases, you can add a reviewer. Invited reviewers will be considered optional unless the review was set up to require a response from their assigned role. For example, if the review was set up to require supervisors, but the guest is invited to respond as a Division Manager, the invited reviewer will be able to mark the item as approved or flagged, but the item will not be considered complete until the Supervisor marks the item as approved or flagged.
To add a reviewer, complete the following steps:
-
Within the review item details area, select the Actions button in the upper right corner, and pick Add Reviewer from the list.
The Add Reviewer window opens, allowing you to invite another reviewer to take action on this item.
-
In the Select an identity field, enter the name of the person or scroll down and pick the person you want to invite.
-
Select the role(s) this person will be filling in as. When the added reviewer takes action on the review item, they will be able to meet the review requirements as the selected role.
-
Select the Save button. The actions are logged in the Activity tab.
Comments
The Comments option allows you to perform all the same actions as the Comments tab.