Directory source detail page
The Directory Source Detail page allows you to view and change settings related to your directory source.
How to get to this page
To view the Directory Source Detail page, complete the following steps:
- Go to the System Configuration cogwheel in the upper right corner of Permission Assist and select Directory Sources.
- Select the directory source. The Directory Source Detail page is displayed.
Imports tab
The Imports tab displays a list of each import attempt. To view detailed information about an import, select the import within the list. The import detail view provides the following metrics:
| Metric | Description |
|---|---|
| Users Count | Total number of users in the current import |
| New Users | Number of users added since the previous import |
| Removed Users | Number of users removed since the previous import |
| Users Delta | Net change in user count compared to the previous import |
| Groups Count | Total number of groups in the current import |
| New Groups | Number of groups added since the previous import |
| Removed Groups | Number of groups removed since the previous import |
| Groups Delta | Net change in group count compared to the previous import |
| Build Time | Duration of the import in seconds |
| Average Build Time | Historical average build time for comparison |
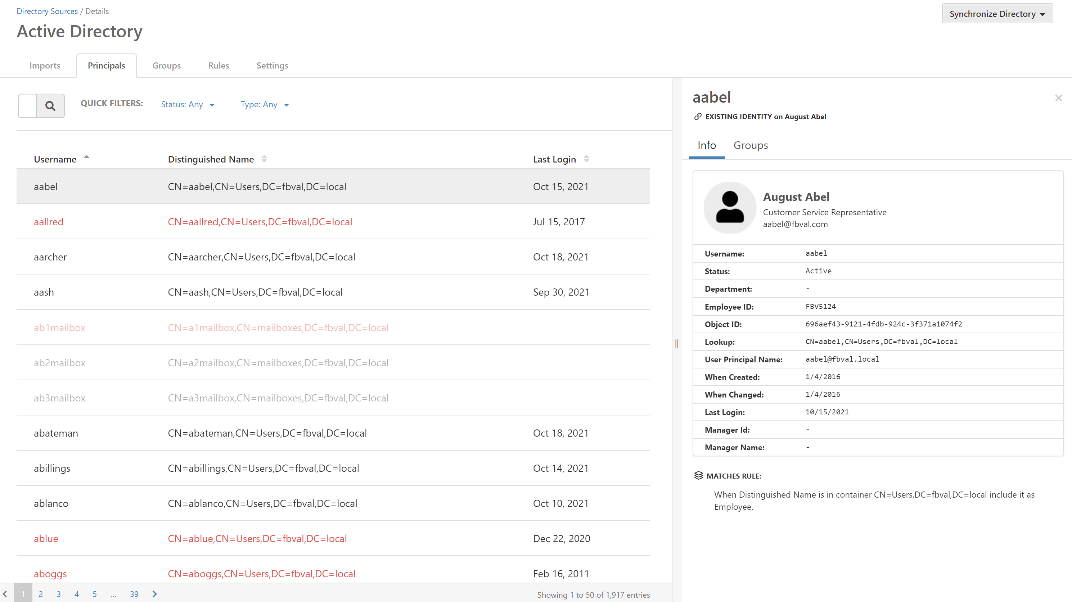
Principals tab
The Principals tab displays a list of all accounts imported from your directory source application (for example, Active Directory). If a test synchronization is run, this tab acts like a staging area, showing which accounts will be added to the identities list when an official sync is completed. Using this tab as a staging area can be helpful when:
- You have just installed Permission Assist and are working on the initial configuration of your directory source
- You want to modify the rules within the Rules tab and are not sure how your identities list might be affected
Principals displayed in black are active accounts; active accounts are the only accounts that count toward your license. Principals displayed in red are accounts that have been disabled within the directory source application. Principals displayed in light grey or light red are accounts that have been ignored according to the rules defined in the Rules tab, which means they will not be imported into the identities list when a sync is completed.
To view more detailed information about a specific principal, select an account within the list. The details panel is displayed on the right side of the page.
Principal details
After selecting a principal, the details area is displayed which allows you to review more detailed information such as department, object ID, and more.
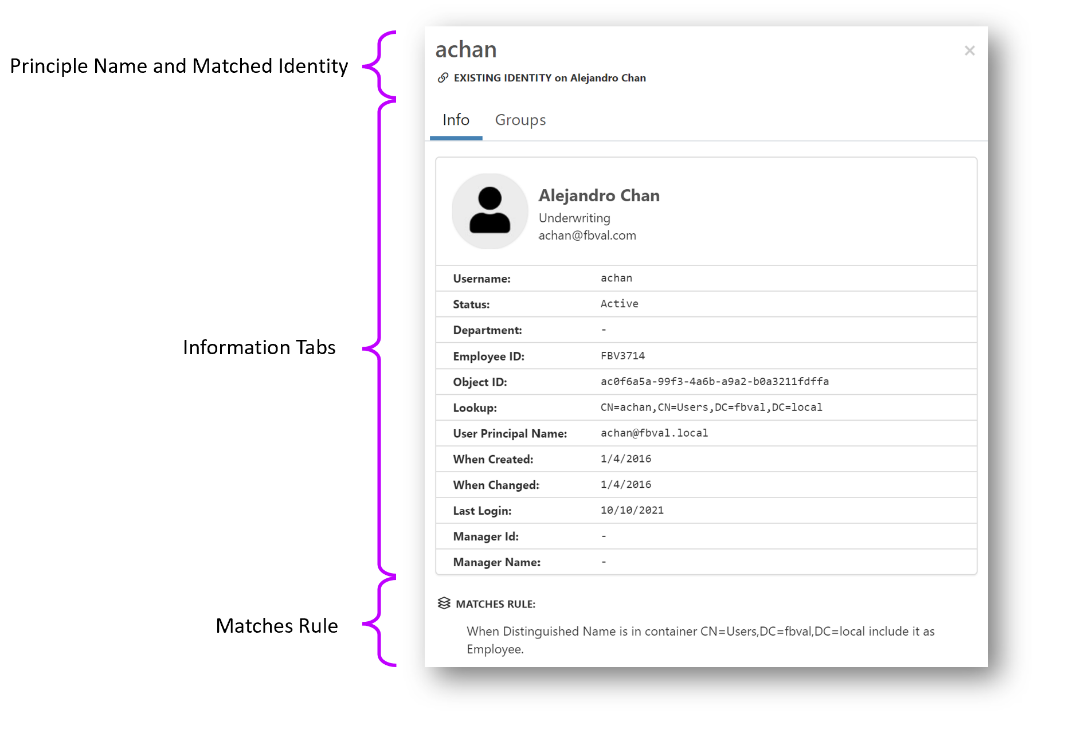
- Principal name and matched identity
- Displays the name of the principal. If the principal exists within the imported list of identities (Manage > Identities), the name of the matched identity is displayed below the principal name.
- Information tabs
-
Contains two tabs of information related to the principal.
Tab Description Info Displays additional directory information about the principal provided by the directory source such as department, email address, status, object ID, last login date, and so on Groups Displays a list of groups associated with the principal - Matches rule
- This area shows the rule used to either ignore the principal or import it as an identity.
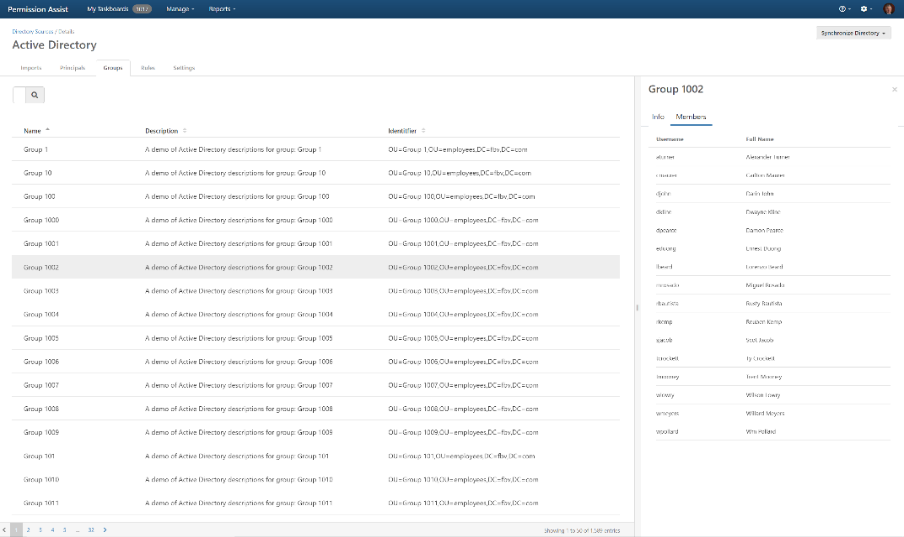
Groups tab
The Groups tab displays a list of the groups within the directory source. Groups displayed in black are groups associated with active principals in the Principals tab. Groups displayed in red are groups that have been disabled within the directory source application. Groups displayed in light grey or light red are accounts that have been ignored according to the rules defined in the Rules tab, which means they are not associated with the principals in the Principals list and will not be imported within Permission Assist.
Group details
After selecting a group, the details area is displayed which allows you to review more detailed information such as a description, the distinguished name of the group, and the members of that group.
Rules tab
The Rules tab is used to define which identities are imported and how those identities are classified. You can also define the schedule that determines how often Permission Assist syncs with the directory source.
- Automatically synchronize this directory and its identities
-
This field allows you to define how often identity information is imported.
By default, this field is set to "never". To change the schedule, select the field and then pick a frequency from the list. The following frequencies are available:
Frequency Additional options 15 minutes -- 30 minutes -- 1 hour -- 6 hours Start hour 12 hours Start hour Daily Start hour Weekly Start hour, day of week Monthly Start hour Quarterly Start hour - Reset the type on identities
-
Within Permission Assist, identities can be classified as specific types such as employee, service account, vendor account, and so on. Identity types can be helpful for sorting and searching, and are also used by Permission Assist to create recommendations.
Select the field at the start of this sentence and then select one of the following options to determine whether your existing identities are reclassified when syncing with the directory source.
Option Description Never When this option is selected, the type for existing identities will not be updated during a sync with the directory source Always When this option is selected, the type for existing identities will be updated when Permission Assist syncs with the directory source - When a new identity is found
-
When a new identity is found, this field determines whether the identity is included or not.
Option Description Include By default, this field is set to "Include" which means new identities will be added to the identities list (this is the option that is most often recommended) Don't include When this field is set to "don't include," new identities will not be added to the identities list unless they meet the criteria set within the list of rules. Using the "don't include" option could be preferable if you have an organized, yet very complex structure within your directory source and you want to strictly limit which identities are pulled in; however, be aware that it could also increase the risk of not bringing in identities that should be reviewed if the structure of the directory source changes (for example, new OUs are added) - However, when...
-
This area is used to create the rules that will be applied when syncing with the directory source. Rules are often created to define identity types and to determine which locations within the directory sources will be used to pull in identities.
Each rule is built from three components: a field to match against, a matcher (comparison operator), and optionally an identity type to assign.
Available fields:
Field Description First Name The identity's given name Last Name The identity's surname Title Job title Department Department name Email Address Primary email address Username Logon name / SAM account name User Principal Name UPN (user@domain format) Distinguished Name Full LDAP path (e.g., CN=John,OU=Users,DC=example,DC=com)Available matchers:
Matcher Description Contains Field contains the specified value (case-insensitive) Starts With Field starts with the specified value Ends With Field ends with the specified value Equals Field exactly matches the specified value (case-insensitive) Available identity types:
Type Description Employee Standard employee account Service Account Non-human service or system account Vendor External vendor or contractor account Shared Shared or generic account Mailbox Email mailbox account Client Client or customer account Temporary Temporary or short-term account Administrator Administrative account Auditor Auditor account AI Agent An account used by an automated system to perform actions on behalf of the organization To add a new rule:
- Select the Add Rule link just to the right of "However, when..."
- Select each field and then select the options you need to create the rules you want.
For example, if you want to exclude mailbox accounts from the list of identities, you might set up a rule as follows:

Additional examples:
If you use an internal standard to create vendor accounts (for example, the user name starts with
vm-), you could assign a "Vendor" type to any identities that start withvm-using a rule similar to the following:
If you have a particular OU within your directory source that you want to exclude, you might create a rule similar to the following:

Caution
The order of the rules matters! Permission Assist applies the rules in numerical order (rule 1 first, then rule 2, and so on).
Settings tab
- Name
- Enter a name for the domain as you want it to appear in the Directory Sources list (for example, Active Directory - Main or Active Directory - Branch 03).
- Label
- (Optional) If you have multiple directory services, this option may be used to enter a descriptive label to help distinguish identities or groups that come from this directory source.
- Allow users to authenticate...
- This option should always remain selected -- even when using SSO -- except in rare cases where multiple directory sources exist. This option works in combination with the system authentication groups to determine what people can do within Permission Assist based on their role.
- Directory Source Reader
- This field is set to Microsoft Active Directory by default and cannot be changed (for now).
Advanced configuration settings
- Hostname
- Enter the hostname of the server running LDAP. Example:
ldap.example.com. Do not enterhttp://orhttps://. - Port
- (Optional) Enter the port number that your directory service is running under (typically
389unless using an SSL connection). - Use SSL
- (Optional) Select this option if your configuration requires an SSL connection.
- Username
- Enter the user that has Windows Authorization Access Group rights to LDAP. Example:
ldapuser. - Password
- Enter the password associated with the user name entered in the Username field.
- Base DN
- Enter the root node in LDAP that Permission Assist will use to start searching for users and groups. Example:
CN=users,DC=example,DC=com.