Install Permission Assist
Note
If you haven't already reviewed and completed the Pre-Installation Instructions, do that before installing Permission Assist.
Step 1 - Create a Permission Assist folder and copy installation files to the server
-
On your Permission Assist application server, create a "PermissionAssist" folder for the application files. Example:
[Drive]:\PermissionAssistTip
Technically, the location of the "PermissionAssist" folder can be anywhere you'd like; however, we find it tends to work easiest if you save these files to a folder on your Permission Assist application server.
-
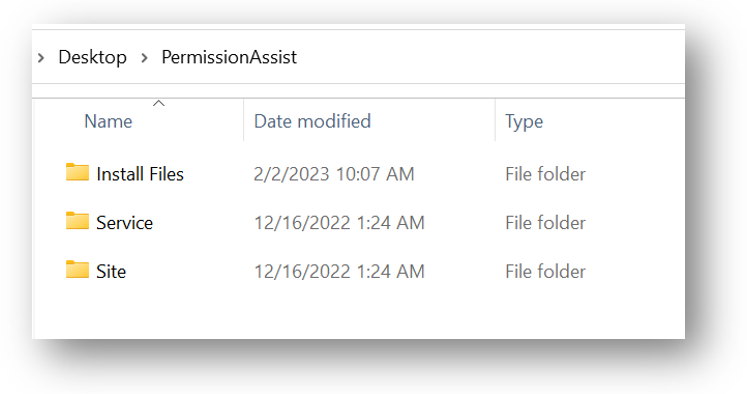
Under the "PermissionAssist" folder, create three new folders - one called "Site", one called "Service", and one called "Install Files". After creating these folders, the structure should look similar to the picture shown below:
-
When installing Permission Assist for the first time, you'll receive a link to download your installation files. The link will download a zipped file which includes three zipped files - one for each of the following Permission Assist components:
- the Permission Assist database migrator
- the Permission Assist jobs runner (service)
- the Permission Assist application files (web/site)
-
Save the zipped file to the
[Drive]:\PermissionAssist\Install Filesfolder. -
Unzip the zipped file. Then, for each of the three zipped files, complete the following steps:
- Right-click on the file and select Properties.
- Verify the file isn't blocked. If the file is blocked, select the Unblock option and then select OK.
-
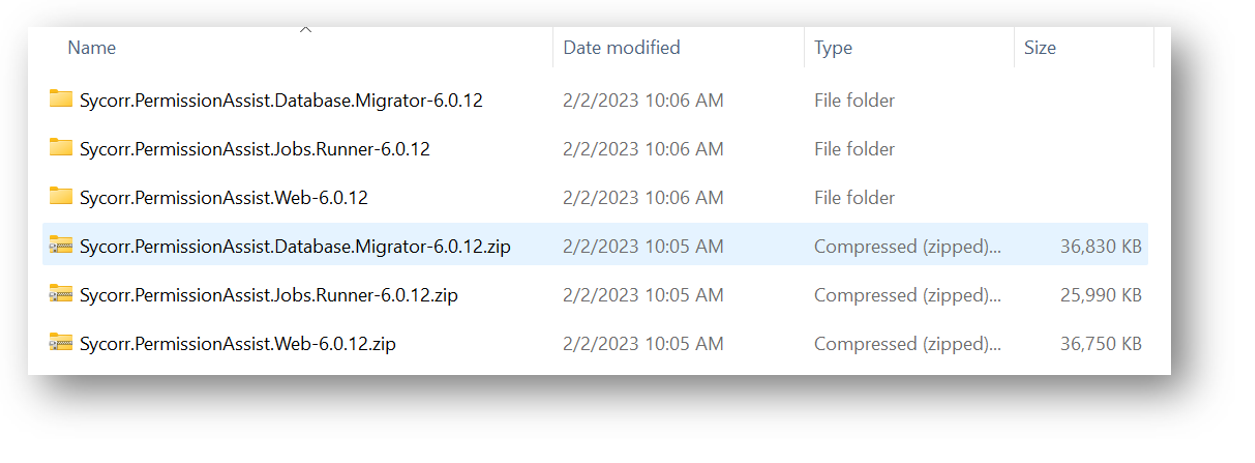
Unzip each of the files. After the files are unzipped, you should see a structure similar to the picture shown below.
-
Continue to Step 2 - Install the Migrator and Initialize the Database.
Step 2 - Install the migrator and initialize the database
Permission Assist is backed by a Microsoft SQL Server database. The Database Migrator is used to initialize the Permission Assist database during the initial installation, and will be used in future upgrades as changes to the database schema are needed. The Database Migrator also tracks which updates have occurred and only applies outstanding changes.
Note
This is a forward-only migration tool, and provides no support for backward migrations. Always ensure your database is backed up before running database modification scripts.
-
In the
Sycorr.PermissionAssist.Database.Migratorfolder, open theSycorr.PermissionAssist.Database.Migrator.exe.configfile in Notepad (or text editor of your choice). -
Locate the line containing the
$connectionStringvariable; it should look something like this: -
Change the connection string (
$connectionString) to a standard Microsoft SQL connection string that will be used to connect to your Permission Assist database. See examples below.Tip
You'll need to copy/paste that same connection string into two additional files later on, so it may be helpful to copy/paste it into a new Notepad file for use later.
-
Save and close the file; then continue to Step 3 - Run the Migrator.
Step 3 - Run the migrator
-
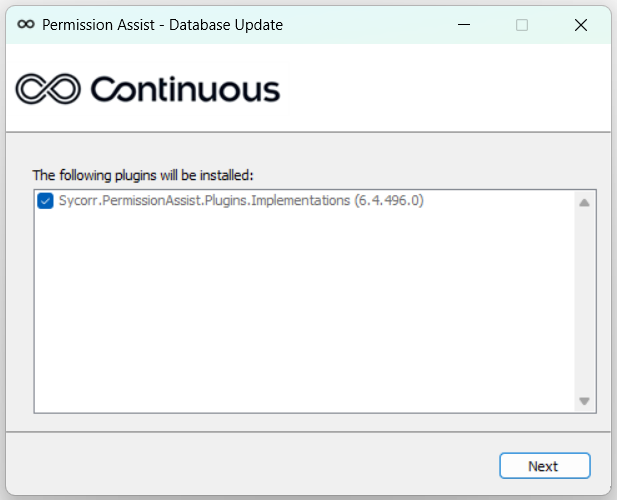
In the
Sycorr.PermissionAssist.Database.Migratorfolder, right-click on theSycorr.PermissionAssist.Database.Migrator.exefile and select Run As Administrator. The Database Update window appears.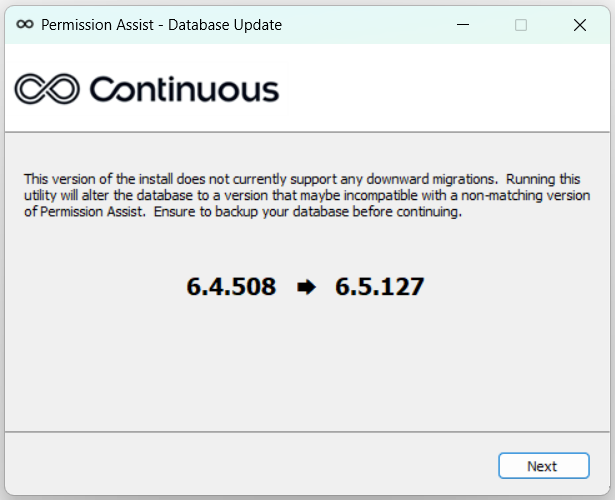
Note
In the example above, the version on the left is the Permission Assist version that you're currently using (the version you're updating from), and the version on the right is be the new version you're currently installing (the version you're upgrading to).
-
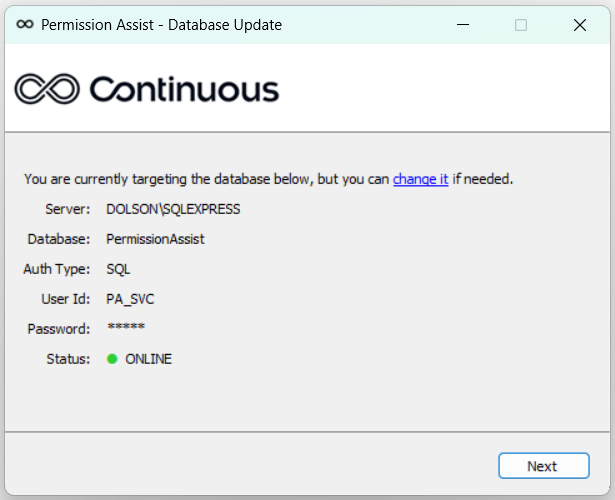
Select Next to begin. A new window is displayed to show the server and database information. If a connection to the database can be made, the Status is displayed as "Online."
-
Select Next. A new window is displayed to show your previous version and the new version.
-
Select Next. As the database update runs, a log is displayed. When the update is complete, select Next. The Permission Assist connector appears.
Note
The connectors for all of your applications are bundled into a single Permission Assist connector file.
-
Select Next. As the application connectors are installed/updated, a log is displayed.
-
When all application connector updates are completed, select Finish. Continue to Step 4 - Install the Service.
Step 4 - Install the service
-
In the
Sycorr.PermissionAssist.Jobs.Runnerfolder, open theSycorr.PermissionAssist.Jobs.Runner.exe.configfile in Notepad (or text editor of your choice). -
Locate the line containing the
$connectionStringvariable; it should look something like this: -
Change the connection string to the same connection string used in the "Step 2 - Install the Migrator and Initialize the Database" section above (see examples below).
-
Save and close the file.
-
Copy all of the files in the
Sycorr.PermissionAssist.Jobs.Runnerfolder and paste them into the[Drive]:\PermissionAssist\Servicefolder. -
If you are installing a second (ex. non-production) instance of Permission Assist on the same server as a previous instance:
Special instructions to install the service for a second instance
The second service needs to be named something different than the first. Complete the following steps to create a separate service specifically for the non-production version:
- Open a Windows command prompt and run it as administrator
- Go to the folder in which the service is installed (ex.
[Drive]:\PermissionAssist_NonProd\Service) - Enter the following command:
-
If this is the first and only instance of Permission Assist on this server, run the
Sycorr.PermissionAssist.Jobs.Runner.exefile to start the service.If you are using a trusted connection string complete the following steps:
- Open the Windows Services window.
- Right-click on the Sycorr - Permission Assist Jobs Runner service and select Properties.
- Select the Log On tab.
- Select This account.
- Select Browse.
- Select Locations.
- Select Entire Directory and select OK.
- In the "Enter the object name to select" area, type the name of the service account Permission Assist is using to connect to the database. This is the same service account that was set up as
db_ownerof the PermissionAssist database. - Select Check Names to ensure the service account is found and accurate.
- Select OK.
- Restart the Sycorr - Permission Assist Jobs Runner service, and continue with "Step 5 - Install the Web Application".
Step 5 - Install the web application
Permission Assist's primary interface is a web application which leverages the .NET 4.8.1 framework or newer.
Configure the web application
To configure the web application files, complete the following steps:
-
In the
Sycorr.PermissionAssist.Webfolder, open theWeb.configfile in Notepad (or text editor of your choice). -
Locate the line containing the
$connectionStringvariable; it should look something like this: -
Change the connection string to the same connection string used in the "Step 2 - Install the Migrator and Initialize the Database" section above (see example below).
-
Save and close the file.
-
Copy all of the files in the
Sycorr.PermissionAssist.Webfolder and paste them into the[Drive]:\PermissionAssist\Sitefolder. -
If you are familiar with creating and managing web applications, create your web site in Internet Information Services (IIS) using your standard practices. If you are not familiar with creating or managing web sites, complete the following steps:
- Open IIS.
- In the navigation pane on the left, expand the server and then expand the Sites folder.
- Right-click on the default website and select Remove.
- Right-click on the Sites folder and select Add Website.
- In the Site name field, enter the name of your site (ex. "Permission Assist").
- Select the ellipsis button (...) next to the Physical path field.
- Browse to the
[Drive]:\PermissionAssist\Sitefolder and select OK. - In the Binding area, select the Type field and then select https.
- Clear the Start Website immediately option (at the bottom of the page).
- Select Ok.
-
If you are using a trusted connection string complete the following steps:
- Select Application Pools (in the navigation pane on the left - above the Sites folder).
- Right-click on the Permission Assist application pool and select Advanced Settings.
- Under the Process Model heading, select the Identity property.
- Select the ellipsis button (...) next to the "ApplicationPoolIdentity" property.
- Select Custom account.
- Select Set.
-
Type the name of the service account Permission Assist is using to connect to the database. This is the same service account that was set up as
db_ownerof the PermissionAssist database.Tip
When entering the user name, enter the domain name first, then a backslash, then the username. Example:
DOMAIN\username -
Enter the password in the Password field.
- Re-enter the password in the Confirm Password field, and select OK.
- Select OK to close the Advanced Settings page.
- In the Actions area on the right, select the Recycle option to recycle the application pool.
Open Permission Assist and complete a health check
To open Permission Assist and verify the installation, complete the following steps:
-
Go back to the Permission Assist website (Sites folder > PermissionAssist).
-
In the Actions area on the right, select the Start option to start the Permission Assist website.
-
On your PC (not on the server) open a supported internet browser (Chrome, Edge, or Brave) and enter the Permission Assist URL.
-
When Permission Assist starts for the first time, there will be a slight delay and then the "Welcome to Permission Assist" page is displayed. An installation process runs; this is a one-time process that happens when you first install Permission Assist or after an upgrade.
Tip
If you're getting an error message for some reason, close your internet browser, restart IIS, make sure the service is up and running, and try again.
Need help? Contact your support team by opening a support ticket here: https://smatech2.my.site.com/SMASupportPortal
-
When the installation is complete, the Username and Password fields are displayed and you're ready to sign in!
-
In the Username field, enter
pa-admin. -
In the Password field, enter
continuousthen select Sign In. -
Once logged in to Permission Assist, select the ? button in the upper right corner and pick Health Check.
-
You should see all green check marks next to all components except for Version Symmetry and Active Directory. This is expected — both will resolve once the system is fully configured.
For a description of each component and what to expect, see Health Check.
Congratulations!
The installation is complete and you're ready to configure Permission Assist!