Pre-installation instructions
Congratulations on your decision to purchase Permission Assist! Before installing, complete the following checklist to ensure your installation goes as smoothly as possible.
Step 1 - Review the hardware and software requirements
Review the Hardware and Software Requirements to make sure your server(s) are set up and ready to go.
Step 2 - Complete the checklist
Before your Permission Assist installation meeting, confirm the following tasks are complete:
Web application server
-
The installation package has been downloaded to the web application server
Note
- Your CSM will send you the link to download the installation files prior to your meeting
-
After downloading the installation file(s), make sure the files are unblocked before unzipping them. If the files are blocked when they're unzipped, it could cause issues or delays during the installation
To make sure files are unblocked, complete the following steps:
a. Right-click on the file and select Properties.
b. Select the Unblock option (displayed in the lower left corner of the window below the Advanced button).
NOTE: If the Unblock option is not available, the file is not blocked and no further action needs to be taken. Select the OK button to close the window.
c. Select the Apply button.
d. Select the OK button.
-
The web application server uses Windows Server 2022 or newer
-
Internet Information Services (IIS) is installed with the proper settings using the following instructions:
- On the Permission Assist application server, open Server Manager.
- Go to the Manage menu in the upper right corner and select Add Roles & Features.
- Select Next until you reach Server Roles.
- Select Web Server (IIS) > Web Server > Common HTTP Features.
- Make sure the following are selected:
- HTTP Errors
- Static Content
- Select Health and Diagnostics and make sure the following is selected:
- HTTP Logging
- Select Performance and make sure the following is selected:
- Static Content Compression
- Select Application Development and make sure the following are selected:
- .NET Extensibility 4.8 (or higher)
- ASP.NET 4.8 (or higher)
- Select Next to go to Features and make sure the following are selected:
- .NET Framework 4.8 (or higher)
- ASP.NET 4.8 (or higher)
- If needed, select the Install button to install features as needed. When the installation is complete, close Server Manager.
-
The ASP.NET 4.8.1 (or newer) framework has been installed on the web application server
Note
This does not get installed with IIS by default. It must be installed separately.
-
The SSL certificate is installed on the web application server
Note
The SSL certificate should have the same URL as the URL defined in the DNS.
Authentication and credentials
-
An account that Permission Assist can use to read and write to the Permission Assist database has been created
Note
- The account can be set up as either a service account (using integrated authentication) or a SQL account (using SQL authentication)
- If you are creating a service account, the account will also need to have both "Log on as batch" and "Log on as service" rights on the web application server
-
The Active Directory service account has been created (this is the account Permission Assist will use to connect to Active Directory). It can be the same account as the service account used to access the database, if needed, based on your internal practices
-
The Active Directory service account has the following permissions:
-
Read all user information
Note
Most accounts will automatically be given this permission when the account is set up.
If you are planning to use the provisioning feature in Permission Assist, confirm the service account also has the following:
- Create, delete, and manage user accounts
- Reset user passwords and force password change at next login
- Modify the membership of a group
-
-
If you are using a service account to connect to the Permission Assist database, the account will need to have "Log on as batch" and "Log on as service" rights on the web application server
Database server
-
MS SQL Server is installed on the database server
-
SQL Server Management Studio is installed on the database server and you can log in using the account created under "Authentication and Credentials"
-
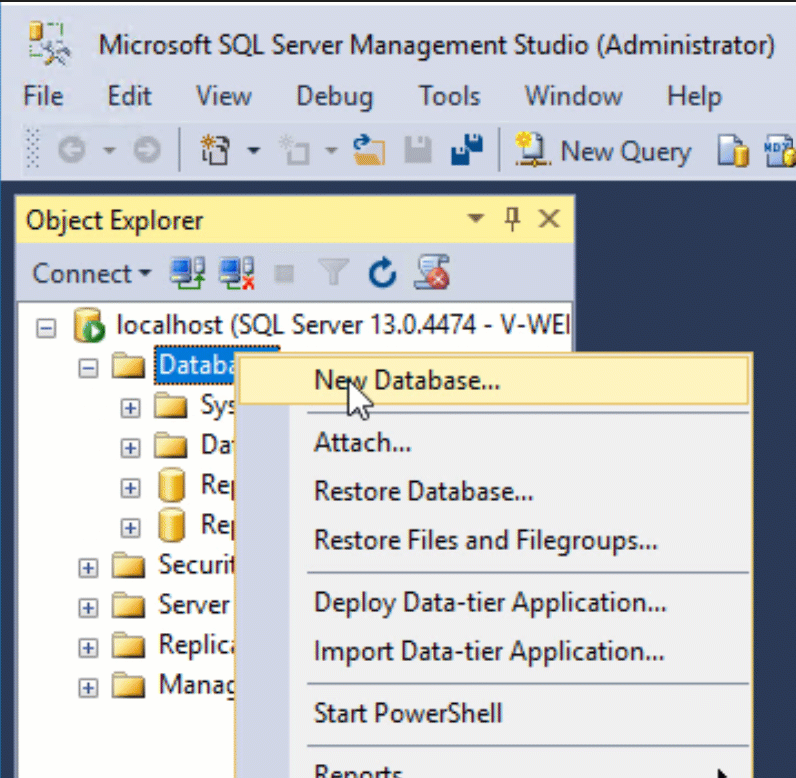
A
PermissionAssistdatabase is created (optional)-
In SQL Server Management Studio, create a new database. The New Database window appears.
-
In the Database Name field, enter the name of your database (for example:
PermissionAssist). - Select OK to save the changes and close the window.
-
Expand the Security folder.
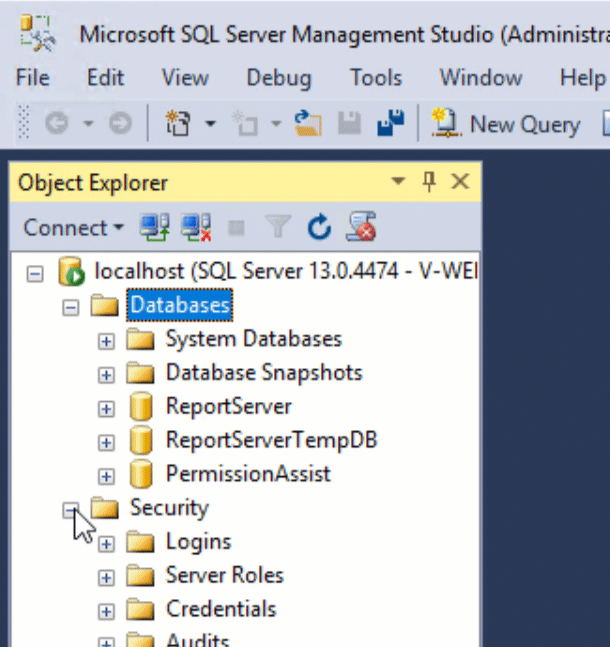
-
Expand the Logins folder.
-
Right-click on the account that Permission Assist will use to connect to the Permission Assist database, and select Properties.
Tip: This account is either the service account or SQL authenticated account mentioned in the pre-installation checklist.
-
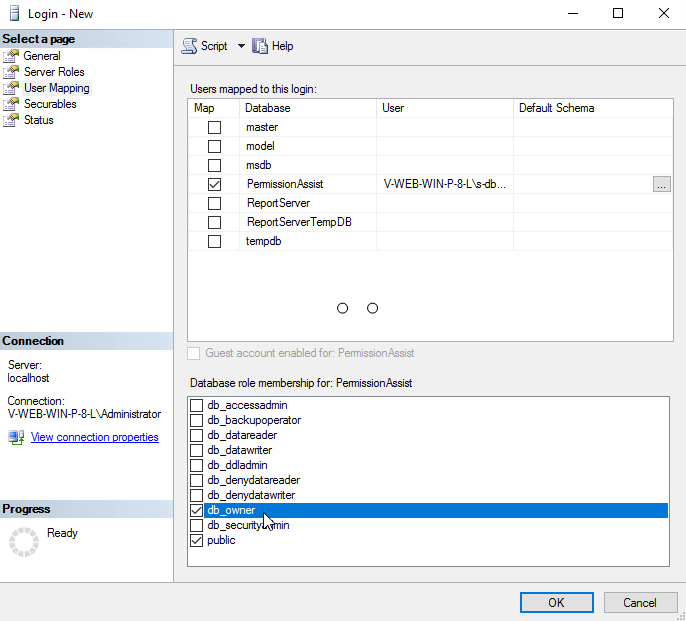
Select User Mapping.
- Select the Permission Assist database.
-
In the "Database role membership for: YourPermissionAssistDatabaseName" area, select the db_owner option and verify that the Public option is also selected.
-
Select OK to save the changes and close the window.
- Close SQL Server Management Studio.
-
DNS
-
The DNS for the Permission Assist website is created
-
The URL matches the URL in the SSL certificate
Active Directory (AD)
-
The Employee Properties > Organization tab for all employees includes the following information:
- Job Title
- Manager
- Organization information (office, department, division, and company)
Network access
- Outbound access to
*.continuous.comis allowed through your firewall (required for email notifications) - Outbound access to
*.sycorr.comis allowed through your firewall (required for software and connector updates)