Add or update a connector
Permission Assist connectors can be added or updated as needed, without having to do a full Permission Assist update.
To update a connector, complete the following steps.
Step 1 - Download the new connector
To download the connector, complete the following steps:
- Log into Permission Assist as an Administrator.
- Go to the System Configuration cogwheel in the upper right corner of Permission Assist and select Software Updates.
-
If automatic notifications are set to Off, select the Check for updates button. This updates the list to show which connectors are new and which connectors can be updated.
Note
For the Check for updates button to work properly, your Permission Assist server must be able to access
*.sycorr.com. If you prefer not to allow this, contact the support portal to request a new connector. When you receive the connector, continue with Step 2 below. -
Select the expand button in the Plugins row. The connector list expands with the Installed tab selected by default.

-
Select one of the following tabs:
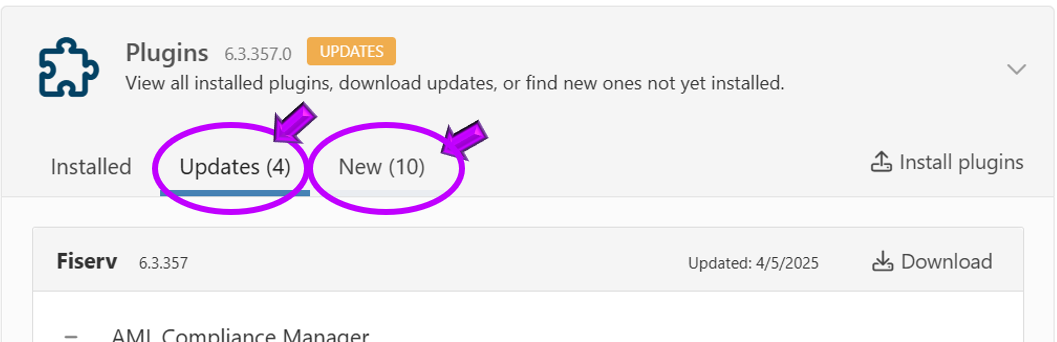
- Updates — select this tab to view connectors that have updates available
- New — select this tab to view connectors that are not yet installed
-
Select the Download Newest link. The connector file is saved to your default download location.
Note
Connectors are bundled together, so the download includes all connectors available in the current version. Connectors with the UPDATED label will be updated when the file is installed.
Step 2 - Install the connector in Permission Assist
Warning
During this process, Permission Assist will need to be restarted. Any user logged into Permission Assist at that time will be automatically logged out. Typically, this process is quick and takes only a few minutes.
To install the downloaded connector, complete the following steps:
- Log into Permission Assist as an Administrator.
- Go to the System Configuration cogwheel in the upper right corner of Permission Assist and select Software Updates.
- Select the expand button in the Plugins row. The connector list is displayed.
-
Select the Install plugins link in the upper right area of the connector list.
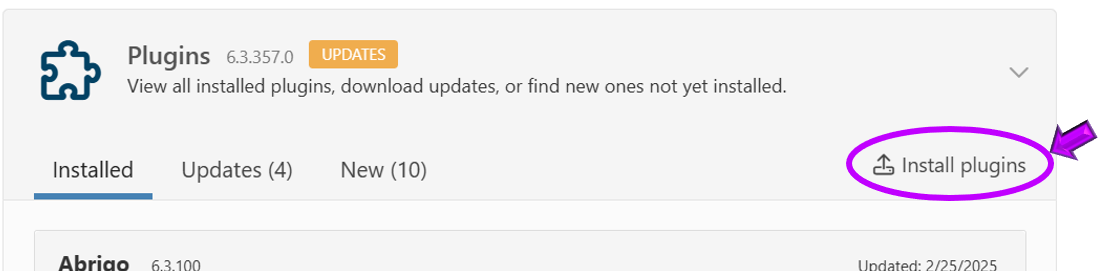
The Install New Plugins window is displayed.
-
Select the Browse button.
-
Browse to where you downloaded the connector(s), and then select the connector(s) you want to install.
Tip
You can install multiple connectors at a time, so select as many connectors as you want.
-
Select the Open button. The list of connectors to be installed is displayed.
- Select the Submit button. The connectors are installed, Permission Assist is restarted, and the login page is displayed. Log into Permission Assist as usual. Continue with Step 3.
Step 3 - Verify the results
If you are adding a new connector, if there have been significant changes to an existing connector, or if it has been a while since you last verified your results, consider verifying the results before your next external audit. For more information, see Verify import data.