Update Permission Assist
Step 1 - Download Installation Files
When a new version of Permission Assist becomes available, you'll see a notification similar to the one below after logging in (if software update notifications are enabled):
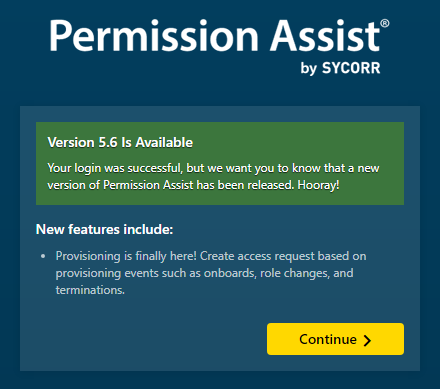
The message appears one time for both Security Team members and Administrators. When you're ready to install the upgrade, use the following instructions to download the installation files:
-
If you don't already backup your Permission Assist database nightly, create a backup of your database.
-
Log into Permission Assist as an Administrator.
-
Go to the System Configuration cogwheel and select Software Updates.
You'll see a "[Version] is available" message at the top of the page similar to the one shown below:
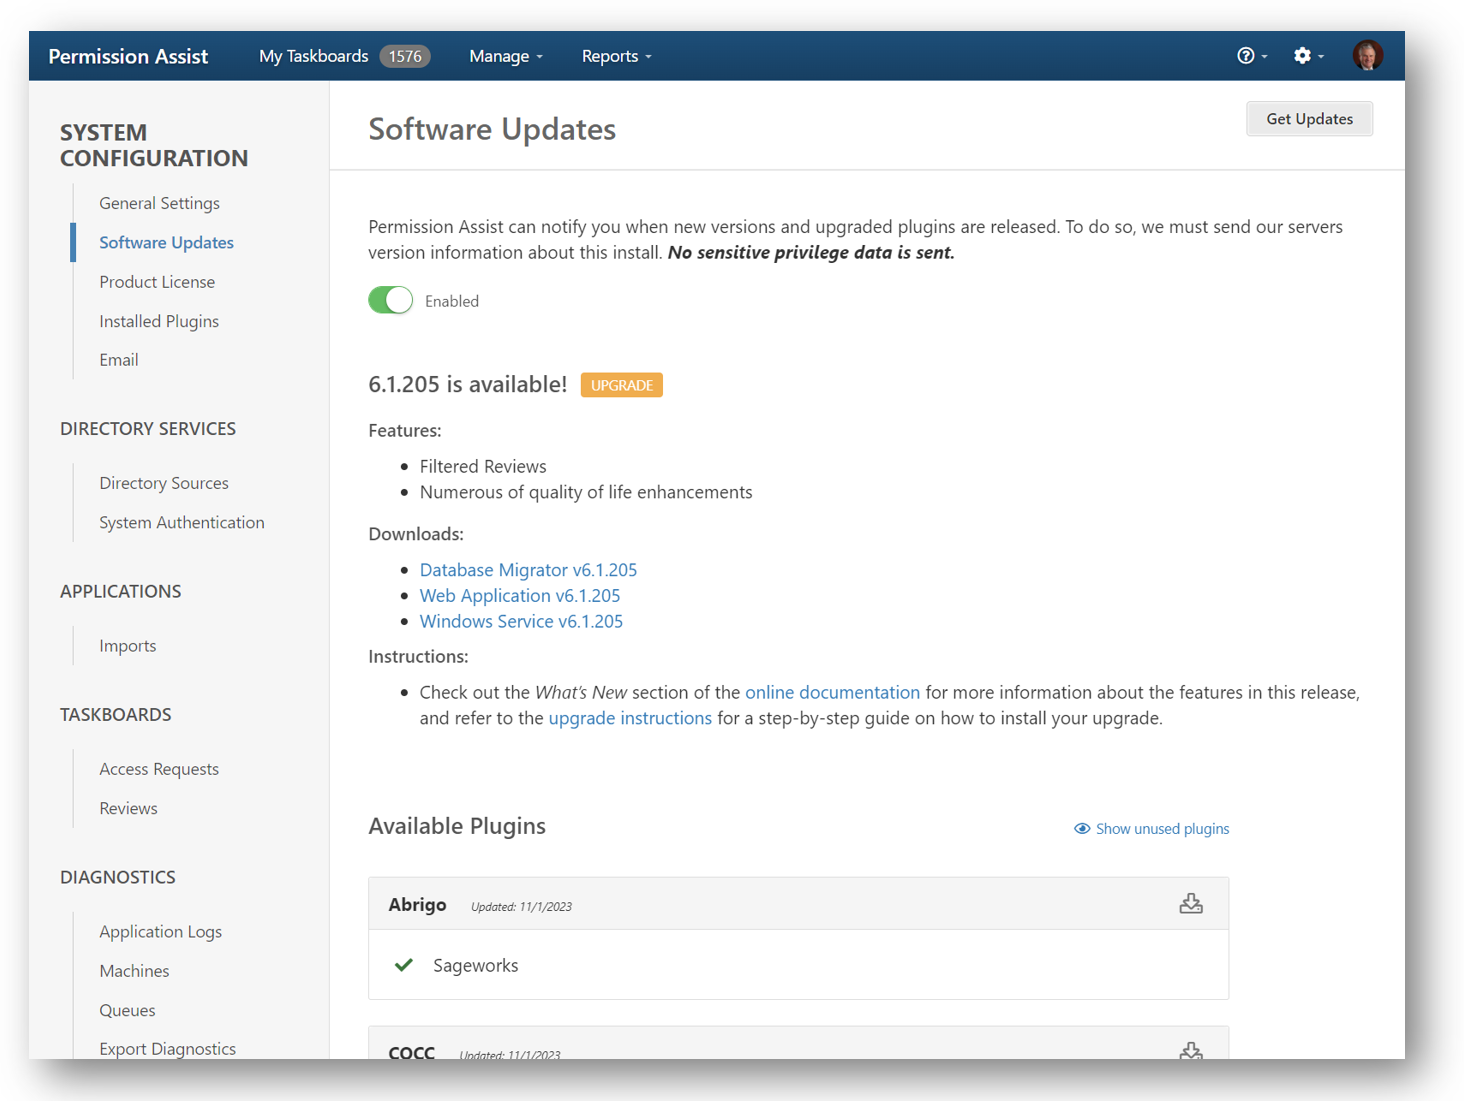
NOTE: If you do not have software updates enabled, please open a support ticket on the support portal located here: https://smatech2.my.site.com/SMASupportPortal
Under the "Downloads:" heading, there will be three links - one for the migrator, one for the Windows service, and one for the web application.
-
Select each of the three links - one at a time - to download the installation files.
-
Save these files to the location of your Permission Assist installation files (ex. [Drive]:\PermissionAssist\Install Files).
-
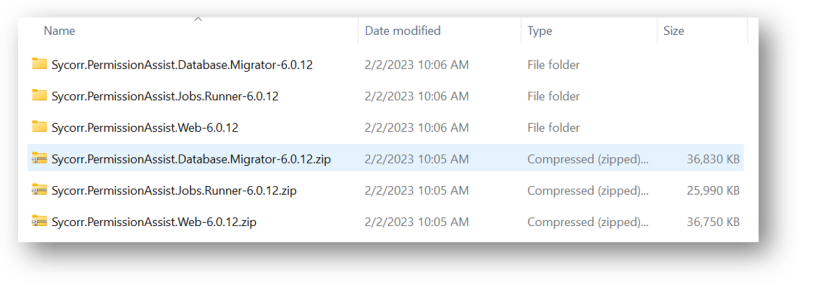
For each zipped file, complete the following steps:
-
Right-click on the file and select Properties.
-
Verify the file isn't blocked. If the file is blocked, select the Unblock option and then select OK.
-
-
Unzip each of the files. After the files are unzipped, you should see a structure similar to the picture shown below.
-
Continue to Step 2 - Stop the Service.
Step 2 - Stop the Service
Open the Windows Services console or the Windows Task Manger and stop the "Sycorr.PermissionAssist.Jobs.Runner" service.
NOTE: If you have more than one instance of Permission Assist on the same server, the name of your service may be slightly different than the one described here.
Step 3 - Copy the Connection String Variable
In this step - we'll be copying your existing ConnectionString variable and pasting it into three separate configuration files:
-
Sycorr.PermissionAssist.Database.Migrator.exe.config
-
Sycorr.PermissionAssist.Jobs.Runner.exe.config
-
Web.config
To do this, complete the following steps:
-
In a Windows Explorer window, browse to the Permission Assist "Site" folder (ex. [Drive]:\PermissionAssist\Site).
-
Open the Web.config file in Notepad (or text editor of your choice).
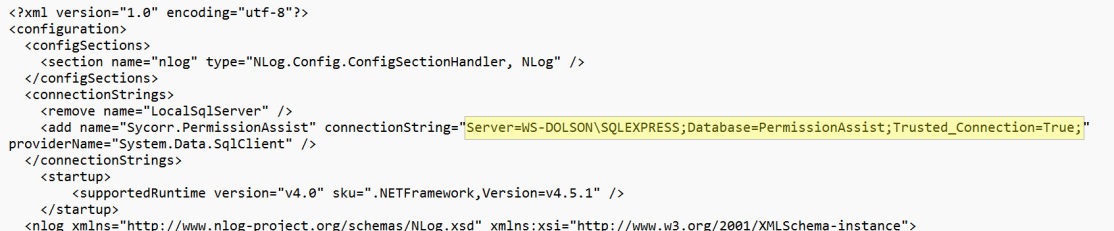
Locate the line containing the "$connectionString" variable; it should look something like one of the following examples:
Samples:
-
Standard Connection: connectionString="Server=YourPAServerAddress;Database=YourPermissionAssistDatabaseName;Uid=Username;Pwd=Password;"
-
Trusted Connection: connectionString="Server=YourPAServerAddress;Database=YourPermissionAssistDatabaseName;Trusted_Connection=True;"
-
-
Copy the connection string - making sure to copy only what's between the set of quotes (see highlighted example in the picture above).

-
Open a new Windows Explorer window and browse to the "Sycorr.PermissionAssist.Database.Migrator" folder. (ex. [Drive]:\PermissionAssist\Install Files\Sycorr.PermissionAssist.Database.Migrator)
-
Open the Sycorr.PermissionAssist.Database.Migrator.exe.config file in Notepad (or text editor or your choice).
-
Paste the connection string into the appropriate location (see example highlighted in picture below):

-
Save and close the file. Then browse to the "Sycorr.PermissionAssist.Jobs.Runner" folder, open the Sycorr.PermissionAssist.Jobs.Runner.exe.config file in Notepad (or text editor of your choice).
-
Locate the line containing the "$connectionString" variable, and paste the same connection string into the appropriate location as you did in the previous file (see sample below).
-
Save and close the file. Then browse to the "Sycorr.PermissionAssist.Web" folder, open the Web.config file in Notepad (or text editor of your choice).
-
Locate the line containing the "$connectionString" variable, and paste the connection string into the appropriate location as you did in the previous files (see sample below).

-
Save and close the file. Continue to the instructions in the next section to Step 4 - Run the Database Migrator.
Step 4 - Run the Database Migrator
-
In a Windows Explorer window, browse to the "Sycorr.PermissionAssist.Database.Migrator" folder. (ex. [Drive]:\PermissionAssist\Install Files\Sycorr.PermissionAssist.Database.Migrator)
-
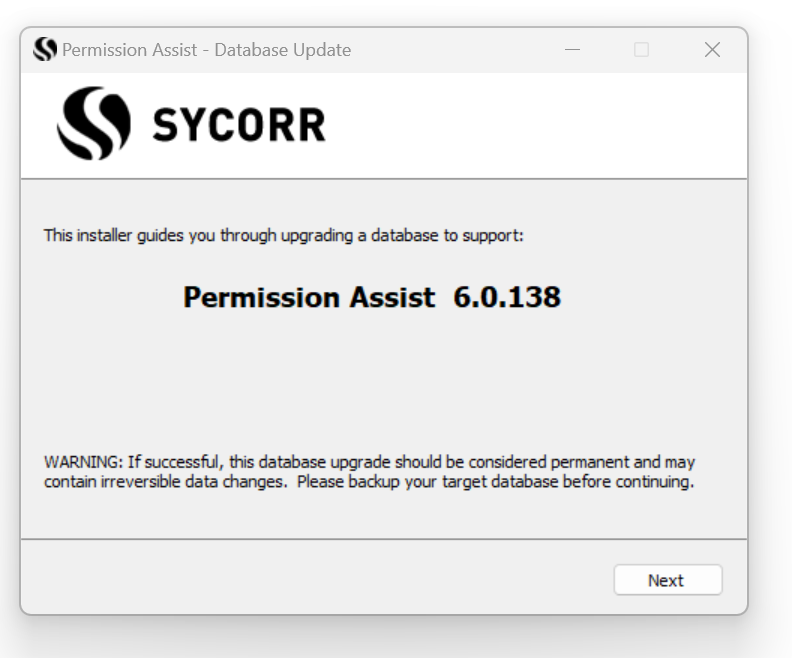
Right-click on the Sycorr.PermissionAssist.Database.Migrator.exe file and select Run As Administrator.The Database Update window appears (see picture below).
-
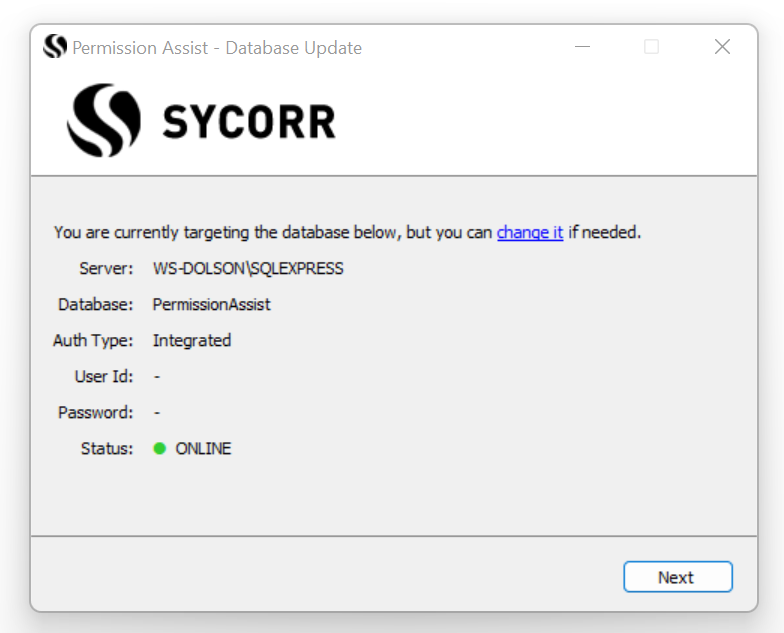
Select Next to begin. A new window is displayed to show the Permission Assist server and database information. If a connection to the database can be made, the Status is displayed as "Online" (see picture below).
-
Select Next. A new window is displayed to show your previous version and the new version.
-
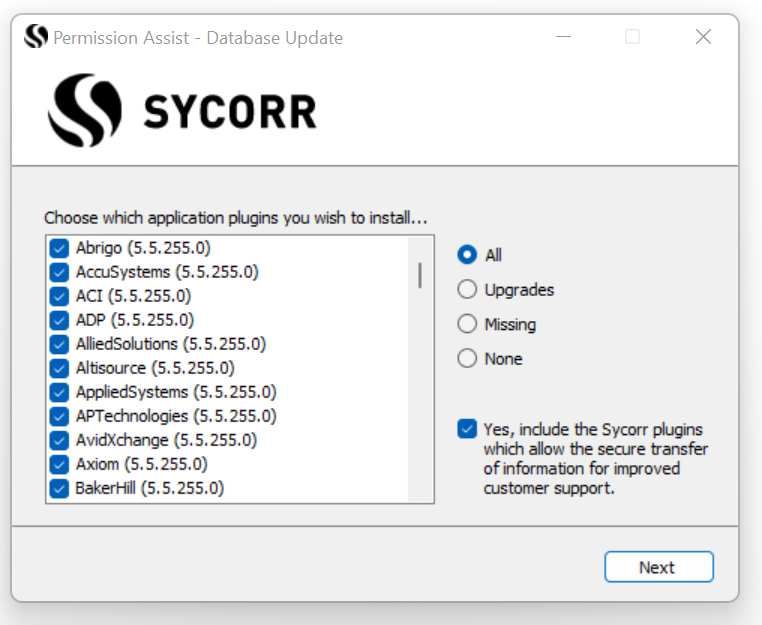
Select Next. As the database update runs, a log is displayed. When the update is complete, select Next. A list of application plugins appears (see picture below).
-
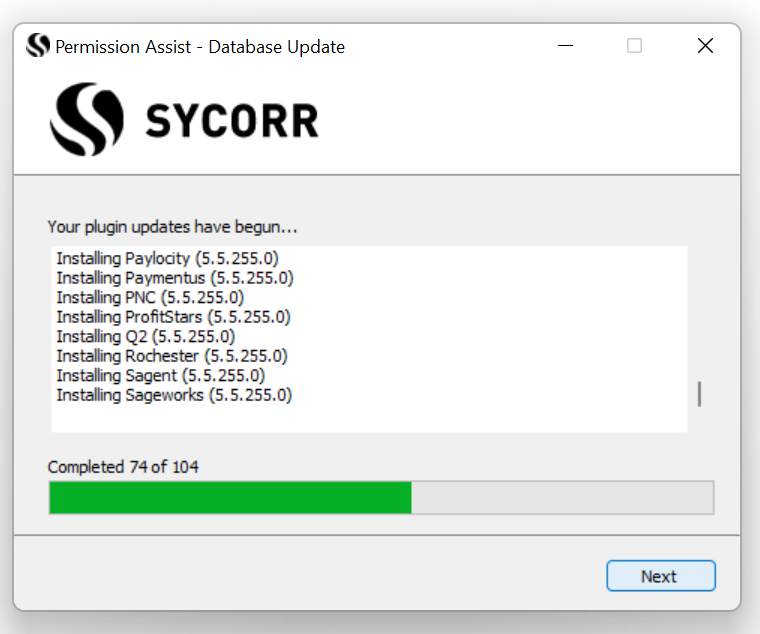
Select Next. As the application plugins are installed/updated, a log is displayed (see picture below).
-
When all application plugin updates are completed, select Finish. Continue to the next section to Step 5 - Install the Service.
Step 5 - Install the Service
-
Browse to the Permission Assist "Service" folder (ex. [Drive]:\PermissionAssist\Service).
-
Delete everything within the Service folder, including other folders if they exist.
-
Copy and paste all files and folders from the "Sycorr.PermissionAssist.Jobs.Runner" folder into to the "Service" folder (ex. [Drive]:\PermissionAssist\Service).
Step 6 - Install the Web Application
-
Browse to the Permission Assist "Site" folder (ex. [Drive]:\PermissionAssist\Site).
-
Delete everything within in the Site folder, including other folders if they exist.
-
Copy and paste all files and folders from the "Sycorr.PermissionAssist.Web" folder into the "Site" folder (ex. [Drive]:\PermissionAssist\Site).
Step 7 - Restart the Service
Open the Windows Services console or the Windows Task Manger and start the Sycorr.PermissionAssist.Jobs.Runner service.
Step 8 - Start Permission Assist and Complete a Health Check
-
On your PC (not on the Permission Assist server) open a supported internet browser (Chrome, Edge, or Brave) and enter the Permission Assist URL.
-
When Permission Assist starts for the first time, there will be a slight delay and then you'll see the "Welcome to Permission Assist" page and an installation process runs (this is a one-time process that happens after an upgrade).
TIP: If you're getting an error message for some reason, close your internet browser, restart IIS, make sure the service is up and running, and try again.
Need help? Contact your support team by opening a ticket on the support portal located here: https://smatech2.my.site.com/SMASupportPortal
-
When the upgrade is complete, the Username and Password fields are displayed. Log into Permission Assist as usual.
-
Go to the top right corner of the page and select the ? button.
-
Select Health Check.
You should see all green check marks next to all components. If all looks good - CONGRATULATIONS- the upgrade is complete!